Shielding Methods In High Speed ​​PCB Design

The transmission rate of high-speed PCB design and routing system is accelerating with the changes of the times, but which also brings a new challenge to it – The anti-interference ability is getting weaker and weaker. This all stems from the fact that the higher the frequency of information transmission, the more sensitive the signal and the weaker the energy, so the routing system is more and more susceptible to interference. In some common electronic equipment, such as computer screens, mobile phones, motors, radio broadcasting equipment, etc., cables and equipment are able to interfere with other components or be seriously interfered by other interference sources.

Shielding Methods In High Frequency PCB Design

Especially when using high-speed data networks, the time required to intercept a large amount of information is significantly lower than the time required to intercept low-speed data transmissions. The twisted pair in the data twisted pair can resist external interference and inter-pair crosstalk through its own twisting at low frequencies, but at high frequencies (especially when the frequency exceeds 250MHz), the twisting alone cannot achieve anti-interference. Purpose, only shielding can resist external interference.

The cable shield acts like a Faraday shield. Interfering signals enter the shield, but not the conductors. Therefore, the data transfer can operate without problems. Network transmission is blocked because shielded cables have lower radiated emissions than unshielded cables. Shielded networks (shielded cables and components) can significantly reduce the radiation level of electromagnetic energy that may be intercepted as it enters the surrounding environment.

Shielding options for different interference fields mainly include electromagnetic interference and radio frequency interference. Electromagnetic interference (EMI) is mainly low frequency interference. Electric motors, fluorescent lamps, and power lines are common sources of EMI. Radio frequency interference (RFI) refers to radio frequency interference, mainly high frequency interference. Wireless communications such as radio, television broadcasting, and radar are common sources of RF interference. For immunity to EMI, braided shielding is the most effective because of its lower critical resistance; For RFI, foil shielding is the most effective. Since the braided shielding depends on the change of wavelength, the gap generated by the braided shield allows the high-frequency signal to freely enter and exit the conductor; for the mixed interference field of high and low frequencies, the combined shielding method of the foil layer with the broadband coverage function and the braided mesh should be adopted. Generally speaking, the higher the mesh shielding coverage, the better the shielding effect.

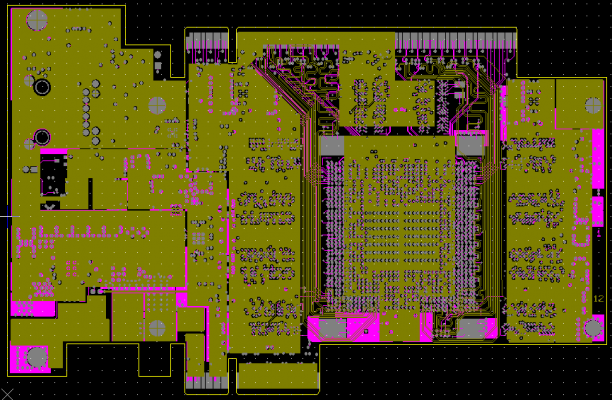
Grande’s PCB Design Capabilities

Maximum Signal Design Rate: 10Gbps CML differential signal;
Maximum PCB Layout Layers: 40 layers;
Minimum Line Width: 2.4mil;
Minimum Line Spacing: 2.4mil;
Minimum BGA PIN Spacing: 0.4mm;
Minimum Mechanical Hole Diameter: 6mil;
Minimum Laser Drilling Diameter: 4mil;
Maximum Number of PINs: ;63000+
Maximum Number of Components: 3600;
Maximum Number of BGAs: 48+.

Advantages Grande Circuit Board Assembly

1)Strength Guarantee

▪ SMT factory: With imported SMT machines and multiple optical inspection equipment, which is able to produce 4 million points per day. Each process is equipped with QC personnel who will keep an eye on product quality.

▪ DIP production line: Two wave soldering machines and more than 10 employees who have worked for over three years. That’ s to say, these workers are highly skilled and can weld various SMT & DIP components.

2)Quality Assurance With High Cost Performance

▪ High-end equipment can paste precision special-shaped parts, BGA, QFN, 0201 package. It can also be soldered prototype PCBA via SMT machine and placing bulk materials by hand.

▪ Both samples, small and large batches can be produced. And there is no SMT Machine starting cost.

3)Rich Electronic Products SMT Soldering Experience With Stable Delivery

▪ Accumulated services to thousands of electronics companies, involving SMT soldering services for various types of automotive equipment and industrial control motherboards. Furthermore, PCBA Products are often exported to Europe and the United States, and the quality is able to be affirmed by new and regular customers.

4)Strong Maintenance Ability & Reliable After-Sales Service

▪ The maintenance engineers have sophisticated experience so that those defective boards caused by all kinds of SMT soldering can be repaired. Meanwhile, ensuring the connectivity rate of each circuit board also make sense.

▪Order problems feedback will get response, solution and solved as soon as possible.

How To Debug The Issue Board?

If the printed circuit board (PCB) works in a harsh environment for a long time, then it may not work normally due to various problems. And if the circuit board cannot work normally and efficiently, we need to debug the circuit board at this time so that the circuit board is able to recover normal and work with high efficiency. So which methods does the debugging of the circuit board have?

Debugging Method 1: Measuring circuit board voltage method

This method first requires us to use the instrument to confirm whether the voltage value of each chip power pin on the circuit board is within the normal range, and also need to test the value of the point’s working voltage to see if its value is within the normal range. For instance: Under normal circumstances, when the silicon transistor is conducting, the BE junction voltage is around 0.7V, while the CE junction voltage is around 0.3V or less. If the voltage value of the BE junction of the transistor is found to be greater than 0.7V during the test (except for special transistors, such as Darlington, etc.), it may be that the BE junction is open.

Debugging Method 2: Signal input method of the circuit board

The principle of this method: Add the signal source to the input terminal, and then measure the waveform of each point in turn to see if it is normal to find the fault point. Sometimes we also use simpler methods, such as holding a tweezers with our hands, and touching the input terminals of all levels to see if the output terminal responds. This is often used in amplifying circuits such as audio and video. If there is no response when the previous level is touched, but there is a response when the next level is touched, which means that the problem lies in the previous level and should be checked.

Debugging Method 3: Look, listen, smell, touch

Look: It is by observing that the surface of the circuit board is obviously mechanically damaged, such as deformation, cracking and other related conditions.

Listening: It is to determine the problem by carefully distinguishing the sound of the work of the circuit board and correcting it with the sound of the normal time.

Smell: It is to check whether there is a burnt smell on the circuit board, the smell of capacitor electrolyte, etc. This situation is very sensitive to these smells for an experienced circuit board repairer.

Touch: It means to feel the components of the circuit board by hand. The problem is that they are all within the normal temperature range. Under normal circumstances, the components of the circuit board will heat up after working. If there is no heat It means that the components are not working properly, but they also heat up in places that cannot be hot. It also means that the circuit board is malfunctioning. In general power transistors, voltage regulator chips, etc., it is completely okay to work below 70 degrees. . If this problem is exceeded, there will be problems.

The adjustment of the circuit board need to solve certain instruments for debugging, and it also requires long-term accumulation of experience in circuit board maintenance. Only long-term accumulation can adjust the circuit board in the shortest time and make the circuit board return to normal operation.

PCB Heat Dissipation Skills

Speaking of the electronic equipment, as we all know, a certain amount of heat will be generated during operation, and which usually cause the internal temperature of the equipment rises rapidly. However, if the heat is not dissipated in time, the equipment will continue to heat up, and the device will fail due to overheating. The reliability of the electronic equipment will definitely decline. Therefore, it is very important to conduct a good heat dissipation treatment on the circuit board. Since the heat dissipation of the circuit board is a vital part, so what is the heat dissipation technique of the printed circuit board? Let’s discuss the heat dissipation method of the circuit board together.

1. Heat dissipation through the PCB itself

At present, the widely used PCB boards are copper-clad/epoxy glass cloth substrates or phenolic resin glass cloth substrates, and a small amount of paper-based copper-clad boards are used. Although these substrates have excellent electrical properties and processing properties, they have still poor in the terms of heat dissipation. As a heat dissipation path for high-heating components, it is almost impossible to expect heat from the resin of the PCB itself to conduct heat; Instead, those heat will dissipate from the surface of the component to the surrounding air. However, as electronic products have entered the era of miniaturization of components, high-density mounting, and high-heating assembly, it is not enough to rely on the surface of a component with a very small surface area to dissipate heat. At the same time, due to the extensive use of surface mount components such as QFP and BGA, a large amount of heat generated by the components is transferred to the circuit board. Therefore, the best way to solve the problem of heat dissipation is to improve the heat dissipation capacity of the PCB itself, which is in direct contact with the heating element, through the PCB board to conduct or radiate.

2. High heat-generating components plus radiator and thermal board

When a small number of components in the PCB generate a large amount of heat (less than 3pcs), a radiator or heat pipe can be added to the heating component. When the temperature cannot be lowered, a radiator with a fan can be used to enhance heat dissipation effect; While the number of heating devices is large (more than 3pcs), a large heat dissipation cover (board) can be used, which is a special heat sink customized according to the position and height of the heating device on the PCB or a large flat heat sink cut out different component height positions. The heat dissipation cover is integrally buckled on the surface of the component, and it contacts each component to dissipate heat. However, the heat dissipation effect is not good due to the poor consistency of height during assembly and welding of components. Usually, a soft thermal phase change thermal pad is added on the surface of the component to improve the heat dissipation effect.

3. For equipment that adopts free convection air cooling, it is best to arrange integrated circuits (or other devices) vertically or horizontally.

4. Use reasonable routing design to realize heat dissipation

Due to the resin in the plate has poor thermal conductivity, and the copper foil lines and holes are good conductors of heat, increasing the residual rate of the copper foil and increasing the heat conduction holes are the main means of heat dissipation.

To evaluate the heat dissipation capacity of a PCB, it is necessary to calculate the equivalent thermal conductivity of a composite material composed of various materials with different thermal conductivity-an insulating substrate for PCB.

5. The devices on the same circuit board should be arranged as far as possible according to their calorific value and heat dissipation degree. Devices with small calorific value or poor heat resistance (such as small signal transistors, small-scale integrated circuits, electrolytic capacitors, etc.) should be placed in cooling the uppermost part of the airflow (at the entrance), and the devices with large heat or heat resistance (such as power transistors, large-scale integrated circuits, etc.) are placed at the lowermost part of the cooling airflow.

6. In the horizontal direction, high-power devices should be placed as close to the edge of the circuit board as possible to shorten the heat transfer path; In the vertical direction, high-power devices should be placed as close as possible to the top of the circuit board to reduce the impact of these devices on the temperature of other devices. .

7. The heat dissipation of the circuit board in the equipment mainly relies on air flow, so the air flow path should be studied during the design, and the device or printed circuit board should be reasonably configured. When air flows, it always tends to flow in places with low resistance, so when configuring devices on a printed circuit board, avoid leaving a large airspace in a certain area. The configuration of multiple printed circuit boards in the whole machine should also pay attention to the same problem.

8. The temperature-sensitive device is best placed in the lowest temperature area (such as the bottom of the device). Never place it directly above the heating device. It is best to stagger multiple devices on the horizontal plane.

9. Arrange the devices with the highest power consumption and the highest heat generation near the best position for heat dissipation. Do not place high-heating devices on the corners and peripheral edges of the circuit board, unless a heat sink is arranged near it. When designing the power resistor, choose a larger device as much as possible, and make it have enough space for heat dissipation when adjusting the layout of the circuit board.

10. Avoid the concentration of hot spots on the PCB, distribute the power evenly on the PCB board as much as possible, and keep the PCB surface temperature performance uniform and consistent. It is often difficult to achieve strict uniform distribution during the design process, but areas with too high power density must be avoided to prevent hot spots from affecting the normal operation of the entire circuit. If possible, it is also necessary to analyze the thermal efficiency of the printed circuit. For example, the thermal efficiency index analysis software module added in some professional PCB design software can help designers optimize the circuit design.

Why Need Make Plug Hole In PCB Manufacturing?

In order to meet customer requirements, the printed circuit board (PCB) via hole must be plugged. After a host of practice, the traditional aluminum plugging process is changed, and the circuit board surface solder mask and plugging are completed with white mesh. Production stable and quality reliable.

As you probably know, via hole plays the role of interconnection and conduction of traces. The development of the electronics industry not only promotes the development of PCB, but also puts forward higher requirements on PCB manufacturing technology and SMT Assembly technology. Via hole plugging technology came into being, and should meet the following requirements:

1. There is copper in the via hole, and the solder mask can be plugged or not plugged;

2. There must be tin and lead in the via hole, with a certain thickness requirement (4 microns), and no solder mask should enter the hole, causing tin beads in the hole;

3. The through holes must have solder mask plug holes, opaque, and must not have tin rings, tin beads, and flatness requirements.

With the development of electronic products in the direction of “light, thin, short and small”, PCBs have also developed to high density and high difficulty. Therefore, a large number of SMT and BGA PCBs have appeared, and customers require plugging when mounting components, mainly five functions:

1. Prevent the tin from passing through the component surface through the via hole to cause short circuit when the PCB is wave soldered; Especially when we put the via on the BGA pad, we must first plug the hole and then plate it with gold to facilitate the BGA soldering.

2. Avoid flux residue in the vias;

3. After the electronics factory SMT Assembly are completed, the PCB must be vacuumed on the testing machine to form a negative pressure before it is completed:

4. Prevent surface solder paste from flowing into the hole, causing false soldering and affecting placement;

5. Prevent the tin balls from popping up during wave soldering, causing short circuits.

Grande PCB Manufacturing Advantages

1. Energy production from 2 to 14 layers, 14-22 layers can be sampled and produced.

2. Minimum trace width/spacing: 3mil/3mil BGA spacing: 0.20MM

3. The minimum aperture of the finished product: 0.1mm Size: 610mmX1200mm

4. Solder Mask Material Brand: Japanese Tamura, Taiyo, Fudokan;

5. FR4: Shengyi, Kingboard, Haigang, Hongren, Guoji, Hazheng, Nanya,

(Shengyi S1130/S1141/S1170), Tg130℃/ Tg170℃ Tg180℃ Contour TG sheet)

6. High frequency board: Rogers (Rogers), Taconic, ARLLON;

7. Surface technology: spray tin, lead-free tin spray, immersion gold (ENIG), full board gold plating, plug gold plating, full board thick gold, chemical tin (silver), anti-oxidation (OSP) blue glue, carbon oil.

What Is PCB Prototype?

What is PCB prototype?

PCB prototype refers to the trial production of circuit board before mass production. It is a way to check whether PCB circuit design is reasonable and function is normal or not. At present, a great number of pcb manufacturers whom provide PCB prototype services that have stable customers and are very popular in the market.

PCB Prototype Service Range

1. FR4 board;

2. Aluminum board;

3. Ceramic board;

4. FPC board;

5. Rigid-flex board, etc.

Why need PCB prototype?

1. To save cost

The obvious advantage of PCB prototype is that it can help companies save costs, because through PCB trial production and professional testing, you can find out whether there are problems with the circuit design, thereby avoiding large-scale production without the need for testing and economic losses caused by poor preservation.

2. To optimize PCB design

How to etch circuits on the PCB and achieve higher efficiency is related to PCB circuit design. Through PCB prototype (sample board production), relevant manufacturers can continuously improve circuit design during testing, which is able to help companies further optimize circuit design and improve PCB board efficiency. Furthermore, PCB prototype will also greatly help improve the company’s product quality and corporate reputation.

3. To bring the technological breakthroughs possibility for innovative companies

Although plenty of innovative R&D circuit design companies have achieved a lot achievements in R&D capabilities, they still need entrust some professional companies to complete the prototype work. By signing a long-term cooperation agreement, we can continuously verify the rationality of the circuit design through PCB prototype, thereby improving the company’s overall innovation capability and laying a good foundation for the company to further break through the technical bottleneck.

Therefore, based on the above points, PCB prototype has now become an indispensable service for every PCB manufacturer. Because the function of PCB prototype cannot be underestimated, whether it is to help other companies save costs, help companies improve designs, or lay the foundation for the company’s R&D breakthroughs, etc. In a nutshell, PCB prototype is indispensable in products innovation and development.

What Should We Prepare Before PCB Prototype?

Grande is a PCB manufacturer with more than 20 years of experience in PCB & PCBA manufacturing whom specializes in PCB prototype of impedance board, HDI board and other multilayer PCB as well as small and medium volume production.

As we all know, there are simple and complex PCB boards. Simple PCB boards are easy to prototype; However, if it is a complex circuit board(PCB) prototype, then we must pay attention to. In other words, if we don’t make full use of the relevant inspection tools during the PCB prototype process, in case something goes wrong, which would be too late until the PCB board was ready. Therefore, we must make full preparations before prototype.

Preparation Before PCB Prototype

1. Making The Physical Frame

The closed physical frame is like a basic platform for the coming component layout and PCB prototype. Accuracy is deserve to concerns a lot. Furthermore, it is best to use arcs at the corners, which can not only avoid scratches by sharp corners, but also reduce stress.

2. Inporting Components & Networks; And Layout For Components

When layout components and networks into the frame of PCB prototype, you must carefully follow the prompts, including the packaging form of the components and the problem of the component network. Because of the contrast prompts, problems are not easy to occur. Layout components and traces have a great impact on product life, stability, and electromagnetic compatibility during PCB proofing, so special attention should be paid. Generally speaking, there should be the following principles: placing order and paying attention to heat dissipation.

3. PCB Layout & Adjustment

It is best to pay attention to the requirements of processing parameters when layout and routing PCB, or place the order to a reliable PCB prototype manufacturer, the defective rate will be greatly reduced. After completing the PCB layout and routing, all you need to do is to adjust the text, individual components, routing and apply copper (this work should not be too early, otherwise it will affect the speed and bring troubles to the PCB design and wiring), the same is for It is convenient for production, debugging and PCB layout and routing;

 4. Checking The Network

Sometimes the network relationship of the PCB board drawn is different from the schematic diagram due to misoperation or negligence. At this time, inspection and verification are necessary. So after finishing painting, you should check it first, and then do follow-up work.

PCB Prototype

Grande PCB Prototype advantages

Mass production: 2- 14 layers;  

Small & Medium Production: 14-22 layers

Minimum Ttrace width/spacing: 3mil/3mil

BGA spacing: 0.20MM

Smallest Aperture of finished PCB: 0.1mm

Size: 610mmX1200mm

Solder Mask: Japanese Tamura, Taiyo, Fu Duo Ken;

FR4: Shengyi, Kingboard, Haigang, Hongren, Guoji, Hazheng, Nanya,

(Shengyi S1130/S1141/S1170), Tg130℃/ Tg170℃ Tg180℃ Contour TG sheet)

High Frequency Board: Rogers (Rogers), Taconic, ARLLON;

Surface Technology: spray tin, lead-free spray tin, full board gold plating, plug gold plating, full board thick gold, chemical tin (silver), anti-oxidation (OSP) blue glue, carbon oil

The above mentioned meshod work that should be prepared before PCB prtotype. In addition, when choosing a prototype company, the best choice is a PCB proofing company with a good reputation, so as to improve the accuracy of the PCB board.

What Is The General Tolerance For Multi-Layer PCB Layout?


Multi layer PCBs
 are beneficial to products because they can handle greater complexity. Computers, telephones, and medical equipment are some examples of applications that benefit from multilayer PCB layout. However, the use of multilayer printed circuit boards will connect these layers to each other as a key issue. If you don’t connect each layer to the corresponding point, you will end up gluing multiple single-layer printed circuit boards together.

Input Via

It is one of the smart solutions to connect each layer vertically. However, Vias need to understand the annular ring to work properly. These rings are defined as the minimum distance between the drilled hole and the edge of the via trace. The larger the annular ring, the larger the copper connection around the borehole.

The use of an annular ring usually determines the size of the shot. Do you use Altium component placement when soldering to one or both sides of the circuit board? And considering soldering, you may need a larger area. Are you just using this channel as a test point without soldering? The smaller ring size can help you.

No matter what application you use toroids in your circuit board layout, you can easily determine the size by referring to our trusted old friend IPC-7251. This document recommends a ring width of 250μm to obtain the maximum material condition (MMC). MMC just means you will have the most powerful solder joints. On the other hand, 150μm is the recommended width of the annular ring to achieve the minimum material condition (LMC). LMC simply means that you will use the most unstable solder joint to connect away.

Obviously, these are just suggestions and should be changed in the light of your specific application.

Manufacturing Tolerances Of Multilayer PCB Layout

When any combination of multiple manufacturing processes occurs in a production environment, there will usually be slight overlap errors due to incomplete tolerances here and there. Specifically, when you etch copper traces on the printed circuit board and during the process of drilling through the traces, your drilling will usually not be completely aligned with the center of these traces and will make you slightly Deviate. But don’t be afraid, the tolerance is here!

Since you should have PCB layout and manufacturing tolerance errors, PCB layout ring tolerance errors are no exception. First, by determining manufacturer-specific tolerances, they will be able to accommodate errors, and by determining the minimum width of the annular ring that can be safe, you can reduce the risk of the entire manufacturing process and ensure that the minimum is always reached.

In short, know that there will be some manufacturing errors in this process, but the above-mentioned errors in PCB design will make you higher than the minimum, especially the annular ring with drilled through holes.

Drilling tolerance plays an important role in determining the size of the annular ring.

Calculate The Annular Ring Width

An easy way to verify that the width is suitable for printed circuit board (PCB) layout is to calculate the maximum width to run after production. The following equation can be used:

((Diameter of trace pad)-(Diameter of drill hole))/2=(Maximum annular ring width)

The larger the tolerance, the smaller the manufacturing error and the smaller the annular ring width. The larger the hole diameter, the smaller the width of the annular ring.

Know that the width of the annular ring should be able to provide a strong enough connection for electrical and mechanical connections, and be able to recognize that manufacturing tolerances will keep your annular ring width at an acceptable distance, and do not even touch the trace pad when drilling Next.

When the via is designed by the PCB to the micro area, you will need PCB design software, which can fully specify the annular ring width and the manufacturing tolerance of the via. Fortunately, Altium Designer can easily handle sensitive circuit board layout complexity through a complete PCB design rule check list and intuitive circuit board layout software.